In-App SDK for Android
Payers will have the almost the same operation process for using In-APP and Paypage. The difference is that if the mobile client integrates the sdk, users will get a smoother experience when paying on the native page than a web page.
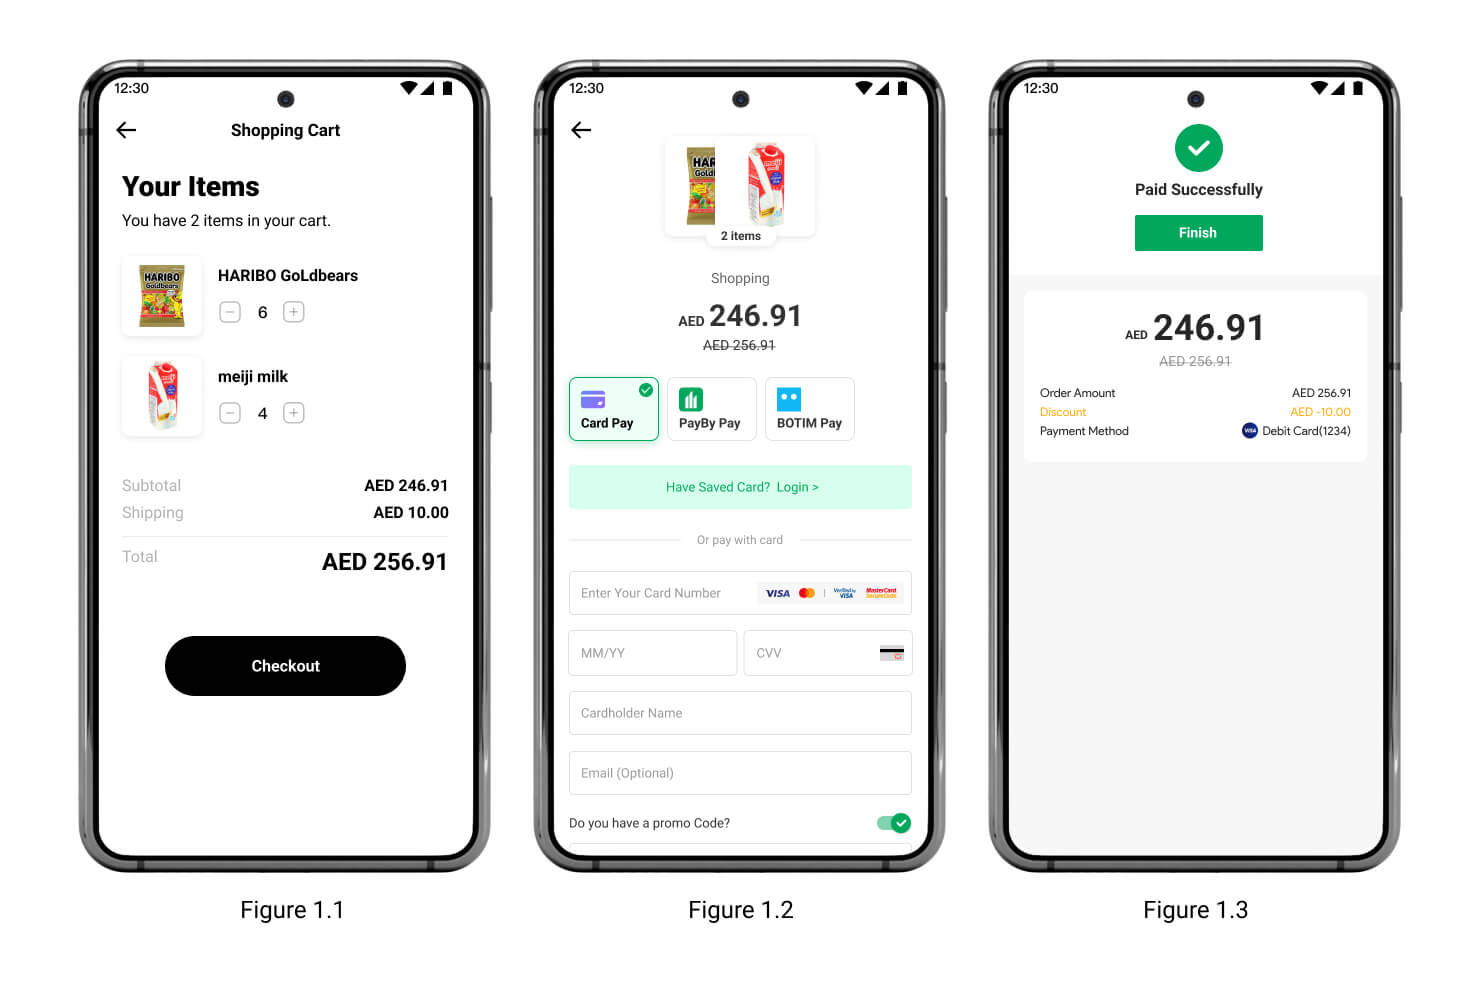
User Experience
- When customers are ready to complete their payment, your mobile application creates a new order creation request.
- The PayBy returns a URL that that redirects customers to a checkout.
- Customers enter their payment details on the checkout and complete the transaction.
- If the payment is completed, customers will be redirected to the merchant's success page.
System Interaction
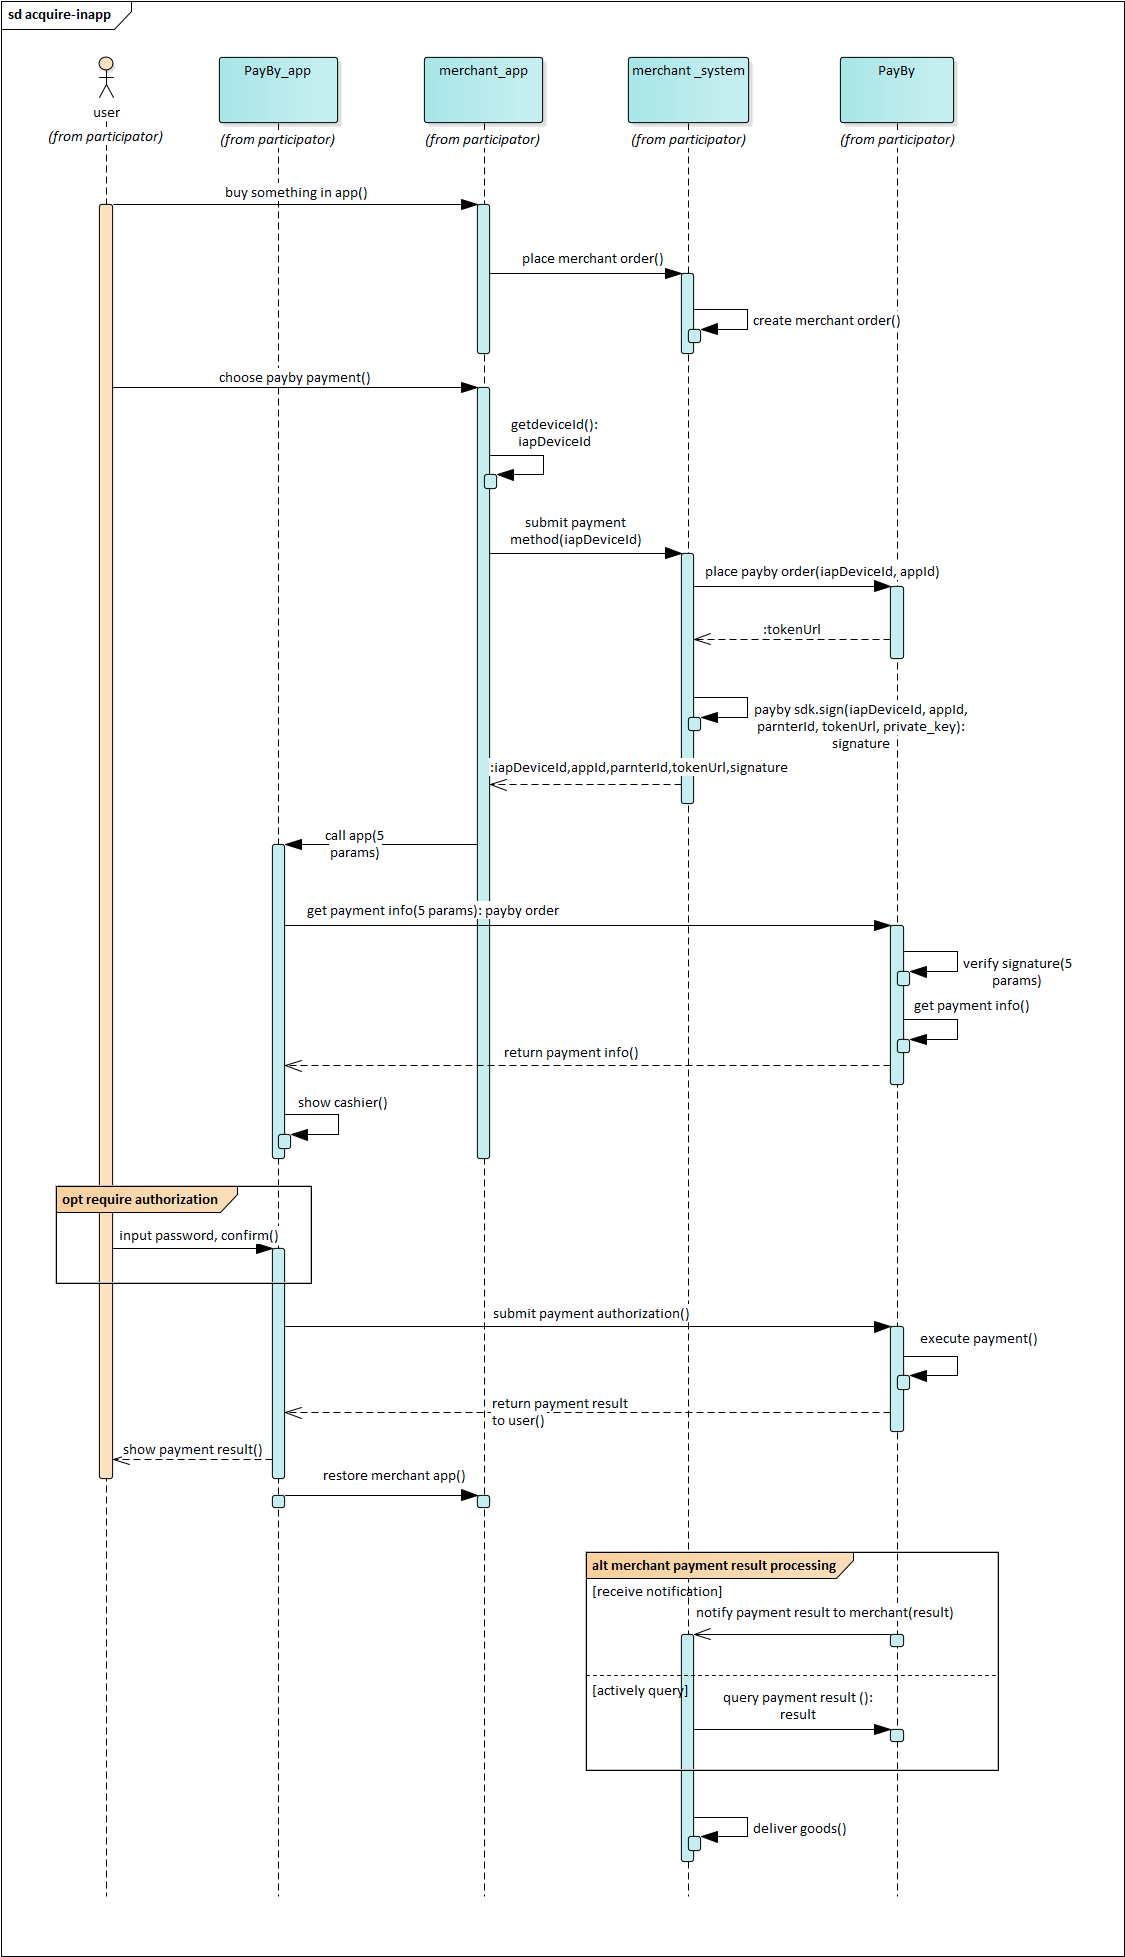
SDK
Term Definition
IAPDeviceId
A unique identifier assigned to each device.IAPPartnerId
A unique identifier assigned to each merchant during the application process for the payment service.IAPAppId
A unique identifier assigned to each application of a merchant during the application process for the payment service.OrderToken
A token that encapsulates order-related information.IAPSign
A digital signature generated in two steps:Sign String Construction: Create a string by concatenating the parameters in the following order:
signString = "iapAppId=" + iapAppId +
             "&iapDeviceId=" + iapDeviceId +
             "&iapPartnerId=" + iapPartnerId +
             "&token=" + token
Signing Process: Encrypt the
signStringusing a private key. The encryption rules are detailed in the provided demo.
Add Dependencies
Use gradle to add dependencies,and also add manifestPlaceholders for downloading APK.
Step 1: Add Repositories
Add the Maven repository address in build.gradle at the root directory of your project:
buildscript {
    repositories {
        google()
        jcenter()
        maven {
            credentials {
                username 'dev'
                password 'dev@123'
            }
            url("http://nexus.payby.com/repository/android-release/")
        }
    }
}
allprojects {
    repositories {
        google()
        jcenter()
        maven {
            credentials {
                username 'dev'
                password 'dev@123'
            }
            url("http://nexus.payby.com/repository/android-release/")
        }
    }
}
Step 2: Add Library
If your project uses AndroidX, add the following lines to gradle.properties:
android.useAndroidX=true
android.enableJetifier=true
Then add the AndroidX library dependency in the build.gradle file of the app module:
dependencies {
    ...
    def iap_version = "2.0.6-RELEASE"
    implementation "com.payby.android.module.iap:lib-iap-view:${iap_version}"
}
If your project uses Android Support, use the same dependency block:
dependencies {
    ...
    def iap_version = "2.0.6-RELEASE"
    implementation "com.payby.android.module.iap:lib-iap-view:${iap_version}"
}
Step 3: Add Placeholder
Add the manifestPlaceholders key-value pair. The key is PACKAGENAME and the value is your current application package name. This is required for Android to read and write files via FileProvider. Also, enable Java 8 compilation support:
android {
    defaultConfig {
        applicationId "com.payby.android.payment.iap.sample"
        ...
        manifestPlaceholders = [
            PACKAGENAME: "com.payby.android.payment.iap.sample"
        ]
    }
    compileOptions {
        sourceCompatibility JavaVersion.VERSION_1_8
        targetCompatibility JavaVersion.VERSION_1_8
    }
}
Note: If
FileProvideris already used in your project, ensure theandroid:authoritiesattribute is set to${PACKAGENAME}in the manifest:
<manifest xmlns:android="http://schemas.android.com/apk/res/android"
    package="com.payby.android.payment.iap.sample">
    ...
    <application>
        ...
        <provider
            android:name="androidx.core.content.FileProvider"
            android:authorities="${PACKAGENAME}"
            android:exported="false"
            android:grantUriPermissions="true">
            <meta-data
                android:name="android.support.FILE_PROVIDER_PATHS"
                android:resource="@xml/file_paths" />
        </provider>
        ...
    </application>
</manifest>
Declare Permissions
Declare the necessary permissions in manifest, including:
- INTERNET: allows an application to download files.
- Read/Write SD card: allows an application to read from / write to external storage.
- Install Package: allows an application to install packages.
<manifest xmlns:android="http://schemas.android.com/apk/res/android"
    package="com.payby.android.payment.iap.sample">
    <uses-permission android:name="android.permission.INTERNET" />
    <uses-permission android:name="android.permission.READ_EXTERNAL_STORAGE"/>
    <uses-permission android:name="android.permission.WRITE_EXTERNAL_STORAGE"/>
    <uses-permission android:name="android.permission.REQUEST_INSTALL_PACKAGES"/>
    <application
       ...
    </application>

</manifest>
If your project targetVersion is 30, you also need to declare the following permission in the manifest.
Parameter Preparation
The payment parameter descriptions and methods to get are as follows. The following parameters can be used to construct a PayTask object, which describes a payment task, by calling pay (PayTask task, Environment env) method in PbManager to complete payment.
| Name | Descriptioin | How to get |
|---|---|---|
| iapDeviceId | Unique identification of device | It is from the api in IAP SDK |
| iapPartnerId | partnerId | It is assigned when a merchant applies for the payment service |
| token | orderToken | After placing an order, you can get it from the response |
| iapAppId | appId | It is assigned when a merchant applies for the payment service |
| iapSign | Signature information after signing iapDeviceId, iapPartnerId, token, iapAppId | It is generated by signing the signature string according to the signing rules. For the signing string signing sequence and rules, see Term Definition |
How To Use
Step 1: Generate IAPDeviceId
// If your payment page is Activity, just pass in this, but if it is Fragment, you should pass in getActivity()
PbManager manager = PbManager.getInstance(this);
String mIapDeviceId = manager.getIAPDeviceID();
Note: When placing an order and paying for the order, the IapDeviceId must not be different.
Step 2: Place an Order
Place the order through your server. After placing the order, retrieve the token and iapSign from the server response.
Step 3: Set the Payment Listener
// Register the payment callback listener
manager.onPayResultListener = this;
Step 4: Pay
Construct a PayTask object using the following parameters in order:
token: Represents the order token.iapDeviceId: Unique identifier for the device.iapPartnerId: Identifier for the merchant.iapSign: Signature generated using the private key.iapAppId: Identifier for the merchant's app.
Initiate the payment using the pay method of the PbManager object. Choose the appropriate environment:
// Development environment
PayTask task = PayTask.with(mToken, mIapDeviceId, mPartnerId, mSign, mIapAppId);
manager.pay(task, Environment.DEV);

// UAT (User Acceptance Testing) environment
PayTask task = PayTask.with(mToken, mIapDeviceId, mPartnerId, mSign, mIapAppId);
manager.pay(task, Environment.UAT);

// Production environment
PayTask task = PayTask.with(mToken, mIapDeviceId, mPartnerId, mSign, mIapAppId);
manager.pay(task, Environment.PRO);
Step 5: Get the Payment Result
Implement the OnPayResultListener interface and override the onGetPayState(String result) method to handle the payment result.
Payment Result Code Description
SUCCESS: Payment completed successfully and received by the payee.FAIL: Payment failed.PAID: Payment made by the payer; awaiting confirmation from the payee.PAYING: Payment is being processed; final result pending.
Proguard-rules
-keep class com.payby.android.iap.domain.value*{ ; }
Sample
Taking the integration of AndroidX dependency library as an example, the complete payment process sample code is as follows. It should be noted that in the actual development process, you need to make your order payment interface to implement the OnPayResultListener interface, the order payment interface can be an Activity or a Fragment. Here MainActivity will be used as an example to simulate the payment process.
public class MainActivity extends AppCompatActivity implements OnPayResultListener {
  EditText et_sign, et_token, et_id, et_deviceId,et_app_id;
  Button pay;
  private PbManager manager;
  private String mToken;  //tokenUrl
  private String mPartnerId;  //partnerId
  private String mSign;
  private String mIapDeviceId;
  private String mIapAppId;

  @Override
  protected void onCreate(Bundle savedInstanceState) {
    super.onCreate(savedInstanceState);
    setContentView(R.layout.activity_main);
    pay = findViewById(R.id.pay);
    et_sign = findViewById(R.id.et_sign);
    et_token = findViewById(R.id.et_token);
    et_id = findViewById(R.id.et_id);
    et_deviceId = findViewById(R.id.et_deviceId);
    et_app_id = findViewById(R.id.et_app_id);

   // Step 1: get PbManager and generate IapDeviceId
    manager = PbManager.getInstance(this);

   //Step 2: generate the iapDeviceId
    String iapDeviceID = manager.getIAPDeviceID();
    et_deviceId.setText(iapDeviceID);

   // Step 3: set the payment result listener
    manager.onPayResultListener = this;
    pay.setOnClickListener(new View.OnClickListener() {
      @Override
      public void onClick(View v) {
        startPay();
      }
    });

  }

  //Step 4: start to pay
  private void startPay() {
    mToken = et_token.getText().toString().trim();
    mPartnerId = et_id.getText().toString().trim();
    mIapDeviceId = et_deviceId.getText().toString().trim();
    mSign = et_sign.getText().toString().trim();
    mAppId = et_app_id.getText().toString().trim();
    if (TextUtils.isEmpty(mToken)
        || TextUtils.isEmpty(mPartnerId)
        || TextUtils.isEmpty(mIapDeviceId)
        || TextUtils.isEmpty(mSign)
        || TextUtils.isEmpty(mAppId)) {
      Toast.makeText(this, "parameter should not be null", Toast.LENGTH_SHORT).show();
      return;
    }
    // support DEV/UAT/PRO
    PayTask task = PayTask.with(mToken, mIapDeviceId, mPartnerId, mSign, mAppId);
    manager.pay(task, Environment.UAT);
    //also,you can use the other method to pay
    //manager.payWithOrderCallback(this);
    // after calling this method,the loading dialog will not be canceled until getting the paying app list.you need implement the method onOrder,in the method,you can pass the order information to SDK by successCallback.
  }

  @Override
  public void onGetPayState(String s) {
       // Step 5: get the payment result and do different processing according to different payment result status
    if (TextUtils.equals(result, "SUCCESS")) {
      // Successful, the payment has been received, the transaction is over
    } else if (TextUtils.equals(result, "PAID")) {
      // The payer has successfully paid and is waiting for the payee to receive the payment
    } else if (TextUtils.equals(result, "PAYING")) {
      // The payment is being processed
    } else if (TextUtils.equals(result, "FAIL")) {
      // Payment failed
    }else{
      // Other unknown errors
    }
  }

    @Override
  public void onGetProtocolState(String protocolState) {
    //PROTOCOL-SUCCESS,PROTOCOL-FAIL
    if (TextUtils.equals(protocolState, "PROTOCOL-SUCCESS")) {
      //success......
    } else if (TextUtils.equals(protocolState, "PROTOCOL-FAIL")) {
      //fail.....
    }
  }

  @Override
  public void onOrder(OnOrderSuccessCallback onOrderSuccessCallback, OnOrderFailCallback onOrderFailCallback) {
  //Tips:if you call method manager.pay(task,environment),do nothing here.
  // if call method manager.payWithOrderCallback(this),you can do the following codes show.
  // step1:in here,you need get order information by placing order.
  // step2:construct a PayTask with the order information
  // step3: if success,pass the order information to sdk with OnOrderSuccessCallback,if fail,just notify SDK the state with OnOrderFailCallback
 // the following code simulates the process of placing order and pass the parameter to sdk
    mToken = et_token.getText().toString().trim();
    mPartnerId = et_id.getText().toString().trim();
    mIapDeviceId = et_deviceId.getText().toString().trim();
    mSign = et_sign.getText().toString().trim();
    mAppId = et_app_id.getText().toString().trim();
    if (TextUtils.isEmpty(mToken)
        || TextUtils.isEmpty(mPartnerId)
        || TextUtils.isEmpty(mIapDeviceId)
        || TextUtils.isEmpty(mSign)
        || TextUtils.isEmpty(mAppId)) {
      Toast.makeText(this, "parameter should not be null", Toast.LENGTH_SHORT).show();
      return;
    }

    //
//    String signString ="iapAppId="+mAppId+ "&iapDeviceId=" + mIapDeviceId+ "&iapPartnerId=" + mPartnerId+"&token=" + mToken ;
//    String sign = Base64.encode(
//        RsaUtils.sign(
//            signString, StandardCharsets.UTF_8, RsaUtils.getPrivateKey(privateKay)));

    if (!TextUtils.isEmpty(mToken)) {
      String signString = "iapAppId=" + mAppId + "&iapDeviceId=" + mIapDeviceId + "&iapPartnerId=" + mPartnerId + "&token=" + mToken;

      String sign = Base64.encode(

          RsaUtils.sign(
              signString, StandardCharsets.UTF_8, RsaUtils.getPrivateKey(keyDev)));
      PayTask task = PayTask.with(mToken, mIapDeviceId, mPartnerId, sign, mAppId);
      new Handler().postDelayed(new Runnable() {
        @Override
        public void run() {
          onOrderSuccessCallback.onSuccess(task, Environment.DEV);
        }
      }, 3000);
    } else {
      new Handler().postDelayed(new Runnable() {
        @Override
        public void run() {
          onOrderFailCallback.onFail();
        }
      }, 4000);
    }
  }
}